
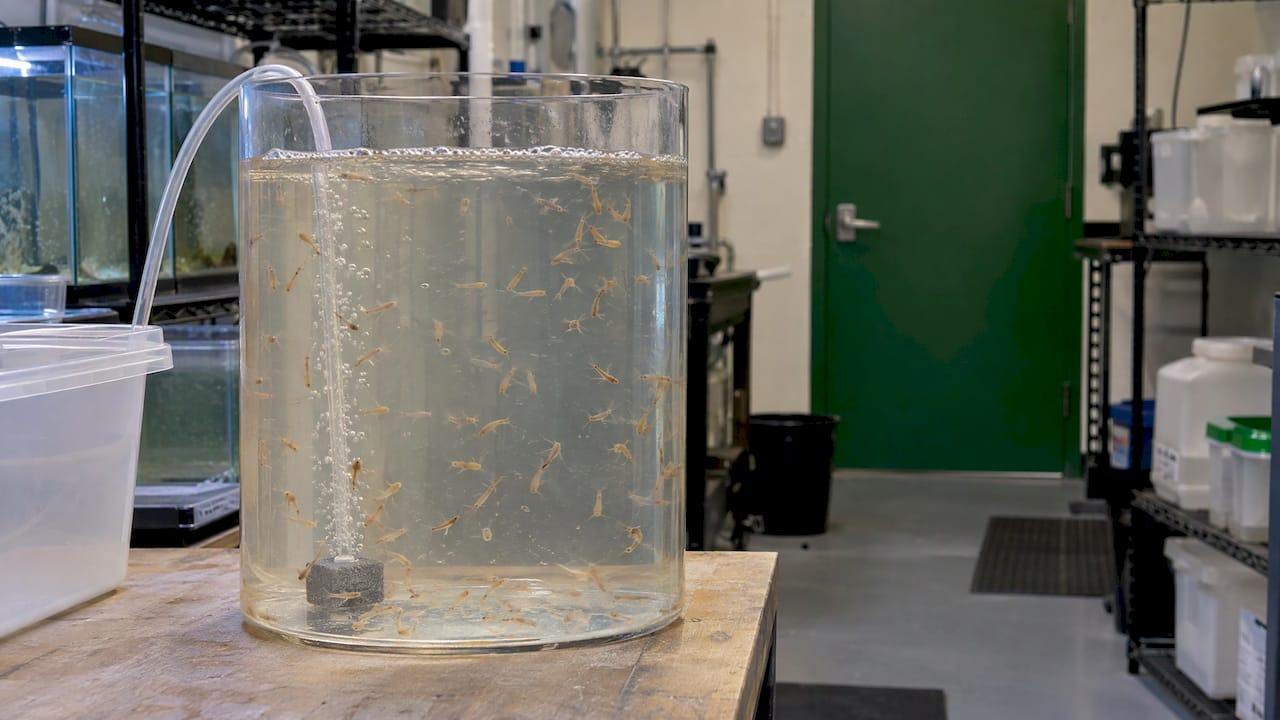
Yes, you can breed your own brine shrimp. Hatching cysts (the dormant eggs) is the easy part and takes about a day. Growing the nauplii (newly hatched larvae) to adults that reproduce takes weeks of steady salinity, temperature, aeration and feeding. If you only need a reliable live feed for fish, farmed live brine shrimp like ours gets you there without running a culture. If you want a self-sustaining colony, this guide gives you the full routine and tells you where it usually goes wrong.
TL;DR
- Brine shrimp reproduce in captivity. Females release either live nauplii or dormant cysts, about 300 every 4 to 6 days, and a female can live 3 to 4 months.
- Hatching needs a constant 77 to 82°F, strong light, constant aeration and salinity in the range of 15 to 35 g/L. Adulthood takes roughly 2 to 3 weeks of feeding.
- Most failures come from too much salt, too many cysts in the vessel, too little oxygen and overfeeding that fouls the water.
- A breeding colony is a project. If your goal is feeding fish, coral or fry, a farmed live shipment skips the culture work.
Table of Contents
- What "breeding" brine shrimp actually means
- What you need before you start
- Step 1: Hatch the cysts
- Step 2: Understand what the nauplius needs
- Step 3: Grow them to adults
- Step 4: Keep the colony going
- Harvesting without fouling your tank
- Where breeding gets difficult
- When a farmed supply is the better route
- Our view
- Get farmed live brine shrimp
- FAQ
- Sources
What "breeding" brine shrimp actually means
Most people who search this phrase mean one of two things. Some want to hatch eggs to feed fish. Others want a colony that replaces itself, so they never buy cysts again. The two jobs are different.
Hatching is a one-time event. A cyst is an embryo in diapause, a paused state of development, about 200 micrometers across, and it can be stored dry for months or years. Put it in saltwater with oxygen, warmth and light and it hatches into a nauplius.
Breeding is the whole loop: hatch, grow, mature, mate, and collect the next generation. That loop depends on how the animals reproduce, which is worth understanding before you build anything.
How brine shrimp reproduce
The FAO's Artemia manual describes two reproductive modes. In the oviparous mode, fertilized eggs are wrapped in a tough brown shell and released as cysts that will not hatch until they have been fully dehydrated. In the ovoviviparous mode, the eggs develop inside the female's brood pouch and she releases free-swimming nauplii.

The FAO notes that some strains are parthenogenetic, meaning females reproduce without males, but most are zygogenetic and need both sexes. The same manual explains the logic: cysts let the embryo go dormant until rain washes it back into water, while live birth happens when conditions are stable. In a stable home culture you will mostly see live nauplii. If the culture is stressed, you may see cysts, which look like small brown specks floating or collecting at the surface.
That is useful for you as a breeder. A culture that begins producing cysts is telling you something is off in its environment.
What you need before you start
Two containers do two different jobs: a hatching vessel and a grow-out container. Many hobbyists try to use one for both and struggle.
For hatching
- A cone- or V-shaped vessel. Texas A&M's aquaculture extension service specifies a V- or cone-shaped container so the cysts stay in motion. A cut and inverted 2-liter bottle works at home.
- An air pump, airline tubing and an air stone, to keep cysts suspended and the water oxygenated.
- A light source and a thermometer. A heater or a warm room keeps the temperature constant.
- Non-iodized salt and dechlorinated water. A hydrometer or refractometer lets you measure salinity instead of guessing.
- A fine sieve and a pipette for harvesting.
For growing out
- A shallow container with a large surface area, which gives better gas exchange. If you use a deeper one, add an air stone.
- Premixed marine salt, a light and a small supply of fine food.
A lab protocol for hatching, published as an appendix to a medaka husbandry handbook, uses a 1 to 3 liter hatchery with an air pump, bubbling stone and thermostat, and 2% saltwater. It stresses adding the eggs only after the salt has fully dissolved, because undissolved salt notably lowers the hatch rate.
Step 1: Hatch the cysts
Get the conditions right
The University of Florida's IFAS Extension aquaculture curriculum gives the clearest numbers for hatching: a constant 25 to 28°C (77 to 82°F), about 2,000 lux of light, salinity of 15 to 35 g/L and dissolved oxygen above 2 mg/L. Cysts hatch in 24 to 36 hours depending on temperature.
Texas A&M gives a slightly different recipe for larger-scale hatching: above 77°F with about 82°F as the optimum, salinity of 5 ppt, heavy continuous aeration, constant light, pH around 8, and no more than 5 grams of cysts per liter.

The ranges differ, and that is fine: cysts hatch across a wide band. What matters is that you pick one set of numbers and hold it. Our guide to hatching at 80 to 82°F and holding at 68 to 74°F explains how the temperature should change between hatching and holding.
A simple routine
- Fill the vessel with dechlorinated water and dissolve the salt completely. Measure the salinity.
- Set the air stone at the bottom so the water is rolling and no cysts settle in dead spots.
- Add a small amount of cysts. Overloading is the most common error: too many cysts use up the oxygen and lower the hatch.
- Light the vessel and hold the temperature steady.
- Check after 24 hours for free-swimming orange nauplii. Wait up to 36 hours if the water is on the cool side.
One caution from the lab protocol: larvae should not sit without aeration and sink for more than 20 minutes. Keep the air running until you are ready to harvest.
Hatch rate also depends on the cysts themselves. Cysts are the only part of this routine you cannot fully control from your bench.
Do not push salinity too high
Brine shrimp can live across an enormous salinity range. Texas A&M describes them as euryhaline, tolerating 3 to 300 ppt, and surviving 15 to 55°C. Surviving is not the same as thriving, though. Aquatic plant author Diana Walstad reports that eggs cannot hydrate and hatch above 85 ppt, and that high salinity stresses nauplii because the adult salt-excreting system takes 4 to 7 days to develop. Her harvests at 19 ppt outperformed those at 28 ppt. Treat "saltier is better" as a myth. For a deeper look at numbers, see our page on brine shrimp water parameters.
Step 2: Understand what the nauplius needs
A newly hatched nauplius is not yet a feeder. Texas A&M explains that it lives on its yolk sac for up to 5 days, through the fifth instar (growth stage), while its calories and protein gradually decline. It begins filter feeding on microalgae, bacteria and detritus about 12 hours after hatching, at the second instar.
This has two practical consequences:
- If you are feeding the nauplii to fish, the nutritional value is highest right after hatching and falls as the yolk is used. Our page on the brine shrimp life stages and the 6 to 12 hour feed window goes into the timing.
- If you are growing them on, you have to start feeding within roughly the first day, with food fine enough for the filter-feeding mouthparts.
Step 3: Grow them to adults
Container and water
Move nauplii to a shallow grow-out container with a large surface area, as the supplier of classroom Artemia kits recommends, or to a deeper one with an air stone. Keep the water gently aerated, not violently, because small animals do not like strong turbulence. Salinity in grow-out is often held higher than in a hatchery, with some classroom protocols using premixed marine saltwater and cooler water, around 68 to 77°F. Do not heat a long-term culture to the top of the hatching range just because the hatch went well.
Feeding
Brine shrimp are filter feeders, so the food has to be small enough to stay suspended. Common choices are live or preserved phytoplankton, spirulina powder, a thin suspension of active dry yeast, or commercial enrichment formulas. One hobbyist guide recommends feeding sparingly, so the water clears within a few hours, and reports adults in about two weeks under proper feeding.
Our phytoplankton is listed at $20 per order, which gives you a live microalgae feed for a culture. Walstad takes a different route: she reuses saltwater that gradually becomes colonized by bacteria and microalgae, so the shrimp feed on what grows there. Her note that a 3-day-old bottle culture is enough to feed a couple hundred fry and juvenile guppies shows how little volume a small feeding program needs.
Overfeeding is the usual cause of crashes. Cloudy, smelly water means decaying food and oxygen loss. Feed a little, watch how fast the water clears, and adjust. Our brine shrimp feeding schedule checklist lays out a routine.
Timeline
The UF/IFAS guide reports that after 2 weeks a shrimp may be about 5 mm long, and that it molts about 15 times before reaching adulthood at 8 to 10 mm. The FAO manual puts full-grown adults at a maximum of 12 mm after 1 to 3 weeks depending on feeding. Plan on about two to three weeks before you see mature animals, and longer if the culture is cool or lightly fed.
| Stage | Typical timing | What to do |
|---|---|---|
| Cyst to nauplius | 24 to 36 hours | Hatch with strong aeration, light and steady warmth |
| Early nauplius | Up to about 5 days on yolk | Begin fine feeding around 12 hours after hatch |
| Juvenile | About 2 weeks, around 5 mm | Feed small amounts, keep water clear |
| Adult | 8 to 10 mm, about 2 to 3 weeks | Watch for reproduction, thin the culture if crowded |
Step 4: Keep the colony going
Once adults are mature, females release nauplii or cysts roughly every 4 to 6 days, according to UF/IFAS. To keep a colony continuous rather than a single cohort:
- Harvest part, not all. Remove some adults or juveniles for feeding and leave breeding stock behind.
- Separate generations. Move a batch of nauplii into a fresh container so crowding does not crash the main culture.
- Watch for cysts. Brown floating specks mean the animals are producing dormant eggs. Cysts can be collected, dried and stored for later hatching, which is how the species survives hard times.
- Replace water in portions. Partial changes with matching salinity beat total changes, which shock the animals.
- Keep a hatch schedule going in parallel. Many keepers hatch a fresh batch every few days so they always have nauplii even if the colony dips.
If cysts are what you are after, the NOAA's Fishery Leaflet 527 traces the live-feed industry to a 1947 discovery that brine shrimp eggs stay viable for at least 10 years in dry, cool storage. For storage, see our guide to brine shrimp meal storage.
Harvesting without fouling your tank
When you are ready to feed, UF/IFAS suggests turning off aeration, letting the shrimp settle and drawing a sample with a pipette. For feeding fish, the key is leaving the hatchery brine and empty shells behind. Briefly stop the air, shine a light to draw nauplii to one spot, collect them, pass them through a fine sieve and rinse before they go into the tank. Pouring the whole vessel in adds salt, shell debris and decaying matter to your fish's water.
Where breeding gets difficult
Hatching a spoonful of cysts in a bottle works for most people on the first try. A running colony is harder, for reasons that tend to repeat:
- Oxygen. Overstocked containers run low, and the culture crashes in a day.
- Salinity drift. Evaporation concentrates salt. Top up with fresh water, not saltwater.
- Feed quality. Too little food starves the culture, too much fouls it.
- Cyst quality. A poor hatch is often the cysts, not your technique.
- Time. A culture needs daily attention for weeks. Most commercial operations decide against it: UF/IFAS notes that most aquaculture operations buy cysts and limit production to decapsulating, hatching and harvesting nauplii. The main U.S. sources are the Great Salt Lake in Utah and San Francisco Bay in California.
When a farmed supply is the better route
If the goal is healthy fish, coral or fry rather than a hobby in itself, the culture work is overhead. We raise brine shrimp on land, in controlled systems, fed exclusively on the microalga Dunaliella, and our shrimp are designed to deliver at least 40% protein with consistent nutrition. Wild-harvested shrimp can vary with the season and may be starved in natural ecosystems. A farmed supply removes that variability, and you do not need to maintain salinity, aeration or a feeding regimen for a colony.
It also fits different readers differently:
- Hobbyists with freshwater fish can read our guide to brine shrimp for freshwater fish, and reef keepers our piece on hatching versus buying for reef tanks.
- Breeders of fry can see best live foods for baby fish fry.
- Labs and museums can look at research-grade brine shrimp.
- Local fish stores and pet retailers can order through our bulk store brine shrimp order page.
Our view
We farm brine shrimp for a living, so we know how much attention a culture needs. Hatching a bottle is a good way to learn how the animal works. Keeping a colony alive for months means holding salinity, oxygen, light and feed steady every day, and a single missed day can end the batch.
Our approach is to do that work on land, in controlled systems, feeding only Dunaliella so protein stays at 40% or more and does not swing with the season. That consistency is what we think fish, coral and fry benefit from most, and it is why we recommend a farmed live supply to anyone whose real goal is a well-fed tank or facility.
If you still want to breed, use the numbers above. Many of our customers will do both: keep a small hatch going for the learning and rely on steady shipments for the feeding.
Demeter
Get farmed live brine shrimp
Our live brine shrimp are priced from $17 to $35 per order, depending on the size you pick. If you want a standing supply, the Demeter Biosciences membership is $25 per month for a monthly live shipment. Gift cards run from $10 to $50 and make an easy present for a fellow keeper.
Stores, museums and research groups can order in volume through the bulk store brine shrimp order page. You can read more about our brine shrimp and how they are raised.
FAQ
Can you breed your own brine shrimp?
Yes. Hatched nauplii grow to adults in a few weeks, and mature females release live nauplii or cysts about every 4 to 6 days. The colony needs steady salinity, oxygen, light and fine food to keep going.
How long does it take brine shrimp to mature?
Cysts hatch in 24 to 36 hours. Juveniles reach about 5 mm after 2 weeks and adults 8 to 10 mm after roughly 2 to 3 weeks, depending on temperature and feeding. Cooler or underfed cultures take longer.
What salinity is best for hatching?
UF/IFAS recommends 15 to 35 g/L, while Texas A&M uses 5 ppt for larger hatching. Pick one value in that range and keep it constant. Very high salinity above about 85 ppt prevents cysts from hatching at all.
Can fish eat brine shrimp every day?
Many keepers feed live brine shrimp as part of a varied diet rather than the only food. Amounts depend on the species and size of your fish. Our feeding schedule checklist shows how to set a routine.
Sources
- Teach Aquaculture Curriculum: Dancing with Brine Shrimp, UF/IFAS Extension
- Artemia Production for Marine Larval Fish Culture, Texas A&M SRAC Publication 702
- Manual on Artemia Production in Salt Ponds, FAO
- Protocol for Artemia (brine shrimp) preparation, medaka-book.org
- Hatching and Growing Brine Shrimp (Artemia), Diana Walstad
- Brine, NOAA Fishery Leaflet 527