
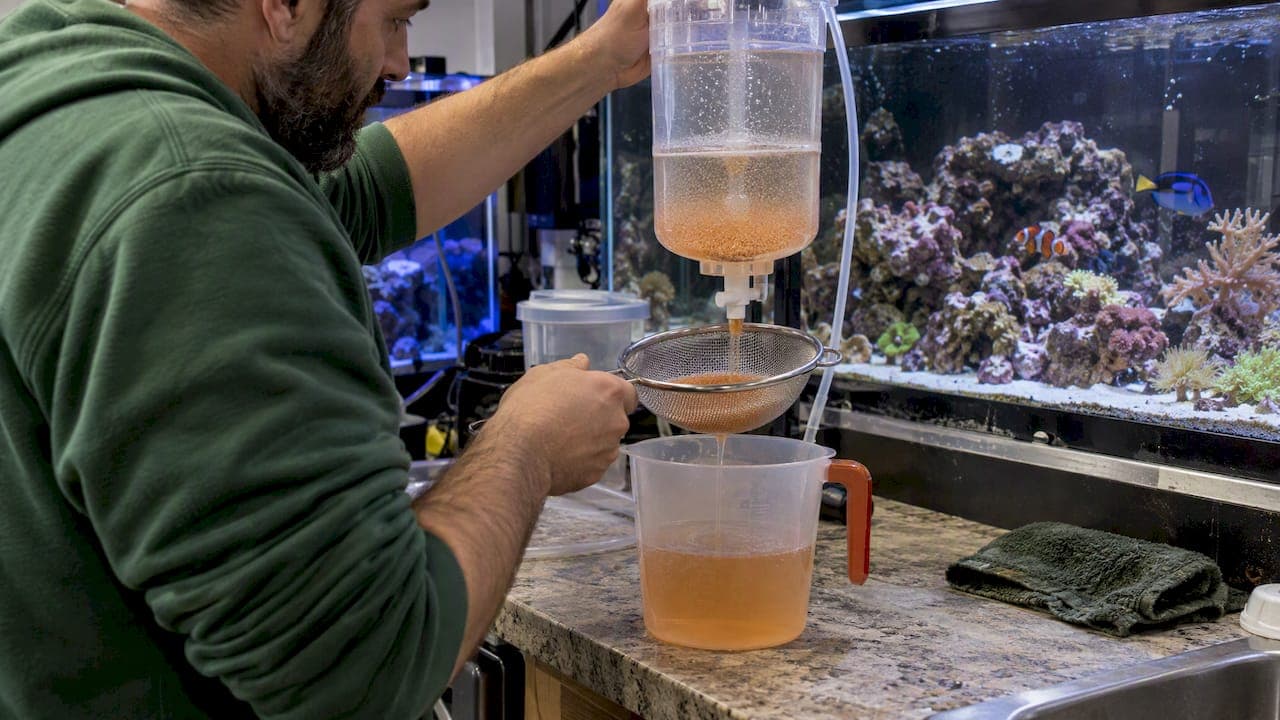
Freshly hatched brine shrimp nauplii make an excellent supplement for many reef fish, but they work best as a planned addition rather than a casual afterthought. Hatch cysts at 79 to 86 degrees Fahrenheit and 25 to 35 ppt salinity with heavy aeration and constant light, then harvest early, around 18 to 26 hours, rinse away the shells, and feed promptly. Enrich the nauplii first if your tank houses mandarins, pipefish, or other HUFA-hungry fish that need more than a plain hatch provides.
TL;DR:
- Harvest nauplii within 18 to 22 hours for maximum nutritional value, as their DHA and EPA content decline rapidly after this period.
- Keep hatch water within 79 to 86 degrees Fahrenheit and salinity between 25 and 35 ppt for optimal hatch rates and uniformity.
- Enrich nauplii with HUFA-rich emulsion for 1 to 4 hours before feeding to boost essential fatty acids necessary for sensitive reef fish.
- Use phototaxis-based separation by illuminating the hatch water to collect healthy nauplii while shells and debris settle, preventing water fouling.
- Store unhatched cysts and nauplii in cold, aerated conditions for up to 24 hours to preserve nutrition, especially when relying on controlled, land-based culture systems.
Table of Contents
- Starter checklist: what to buy and what to prepare before you hatch
- Step-by-step hatching protocol with exact parameters and simple scaling math
- How to time the harvest and separate nauplii from shells without fouling your reef
- How to enrich nauplii and why it matters for reef fish nutrition
- Feeding techniques and which reef animals gain the most from brine shrimp
- DIY hatchery designs and a troubleshooting checklist for hobbyists
- Why farmed, microalgae-fed brine shrimp can be a better option
- What the research actually supports for reef hobbyists
- How to order Demeter live brine shrimp and subscription options
- Sources
- FAQ
Starter checklist: what to buy and what to prepare before you hatch
Before you crack open a jar of cysts, gather the basics and get your water right. A bad hatch is almost always a setup problem, not a shrimp problem.
- Brine shrimp cysts, a hatching cone or a repurposed soda bottle, and an aquarium air pump with an airstone.
- A reliable salt mix or filtered seawater, plus a thermometer and a hydrometer or refractometer.
- A small clamp light or desk lamp for constant illumination during the hatch cycle.
- A fine mesh siphon or brine shrimp net for harvest and rinsing.
- A dechlorinator or water conditioner if you are using tap water, since trace metals are a common cause of failed hatches.
Set your hatching vessel to temperature and salinity numbers before adding a single cyst, not after. pH should sit near 8, and aeration needs to be strong enough to keep every cyst in suspension rather than settled at the bottom where oxygen runs short.
Step-by-step hatching protocol with exact parameters and simple scaling math
The conditions that work in a commercial hatchery scale down cleanly to a kitchen counter setup. According to Virginia Cooperative Extension's Artemia guidance, cysts hatch best at 26 to 30 degrees Celsius (79 to 86 degrees Fahrenheit), a salinity of 25 to 35 ppt (specific gravity around 1.018 to 1.026), strong aeration, and continuous light. Under these conditions, most cysts hatch within 18 to 24 hours.
- Fill your cone or bottle with properly salted, dechlorinated water at the target temperature.
- Add cysts at a maximum of 2 grams of dry cysts per liter, or up to 5 grams per liter if you add supplemental oxygen.
- Position an airstone at the bottom so the entire water column stays agitated.
- Keep a light source on continuously; brine shrimp hatch rates drop without it.
- Check for orange nauplii swimming near the surface starting around 18 hours in.
The hatching window matters more than most hobbyists realize. Research on harvest timing found that fatty acid and carotenoid content in nauplii peaks approximately a day after hatching, then declines as the nauplii burn through their yolk reserves.
Some hobbyists decapsulate cysts in a bleach solution before hatching, which removes the shell entirely and skips the separation step later. It also slightly shortens hatch time and removes a source of tank fouling, though it adds a chemical handling step that beginners often skip in favor of the simpler shell-and-separate method. If you need to scale a batch up or down, the math is straightforward: decide how many milliliters of packed nauplii your tank needs, then back-calculate cyst grams using your cone's volume and the stocking density above.
How to time the harvest and separate nauplii from shells without fouling your reef
Shells and unhatched cysts are the main reason hatching directly in a display tank is a bad idea. They cloud water, get sucked into skimmers, and offer no nutritional value. Separation solves this before the nauplii ever reach your fish.
- Turn off the airstone and let the cone sit for 5 to 10 minutes so heavier shells and debris settle toward the bottom.
- Shine a light at one side of the container; live nauplii are strongly phototactic and will swim toward it, away from the settled shells.
- Siphon the illuminated nauplii cluster through a fine mesh net, leaving shells and debris behind.
- Rinse the harvested nauplii briefly under fresh saltwater to remove any residual hatch water before feeding.
This phototaxis-based method is a standard DIY shell separator technique documented by Reef Builders, and it works without any chemical additives.
Harvesting earlier rather than later preserves more of the nutritional value. The same 2025 harvest-timing study found that nutrient content was highest near 22 hours and declined as digestibility dropped with later harvest times, so waiting an extra day to harvest a bigger batch comes at a nutritional cost.
Pro Tip: Run two cones on a staggered schedule, a few hours apart, so you always have a fresh batch near its nutritional peak instead of one large batch aging past it.
How to enrich nauplii and why it matters for reef fish nutrition
Freshly hatched nauplii carry roughly 60% protein by some estimates from gut-loaded feeds, but their HUFA content depends almost entirely on what they are fed or enriched with. A plain hatch gives your fish protein and movement that triggers feeding response, but not necessarily the DHA and EPA that growing fish and larvae need.
- Soak harvested nauplii in a HUFA-rich enrichment emulsion for 1 to 4 hours before feeding.
- Keep the enrichment container aerated and near hatching temperature so nauplii stay active and keep filter-feeding.
- Feed enriched nauplii promptly, since their nutrient boost fades as they metabolize the emulsion over subsequent hours.
Enrichment can raise DHA and EPA levels substantially within a short soak, and this is considered standard practice in commercial hatcheries feeding fish larvae.
Mandarin dragonets, pipefish, and seahorse fry generally need enriched live food because their diets in captivity rarely include enough natural HUFA otherwise. Established, healthy adult fish eating a varied diet can usually do fine on plain, freshly hatched nauplii as an occasional treat. If you need to hold nauplii before feeding, cold storage between 2 and 10 degrees Celsius with light aeration slows their metabolism and can preserve them for up to 24 hours at high concentration, though activity level drops the longer they sit cold.

Feeding techniques and which reef animals gain the most from brine shrimp
Mandarins, pipefish, certain gobies, and juvenile clownfish respond especially well to live, moving brine shrimp because the motion triggers a feeding response that frozen food often does not. Brine shrimp work as a supplement to a varied diet, not a full replacement for copepods, which carry a broader nutrient profile that fish rely on long term.
- Target feed with a turkey baster or pipette directly near slow-feeding fish like mandarins and pipefish.
- Use a feeding cup or floating ring to concentrate nauplii in one spot rather than dispersing them across the tank.
- Turn off strong flow and skimmers briefly during feeding so nauplii stay in the water column longer instead of getting pulled into mechanical filtration.
Hatching cysts directly inside a display tank is discouraged. Empty shells accumulate on rockwork and in filter socks, and any unhatched cysts can introduce bacteria into the system. Nauplii also do not survive long in a reef tank once released; most are eaten, filtered out, or settle within a couple of hours, so they are best treated as a fresh, consumed-quickly meal rather than a population that establishes itself.
DIY hatchery designs and a troubleshooting checklist for hobbyists
An inverted two-liter bottle with the bottom cut off makes a serviceable hatching cone. Mount it upside down in a stand, run airline tubing to the neck opening at the bottom, and let the cone shape keep cysts suspended in the current. A second container with a lamp on one side, set up exactly like the separation method described above, handles shell removal once the hatch finishes.
- If nauplii look sluggish or the hatch rate seems low, check your water source first. Tap water with trace metals is a frequent, often overlooked cause.
- If foam builds up excessively, reduce airflow slightly. Overly aggressive aeration can trap cysts in surface foam where they never hatch.
- If salinity or temperature drift outside the recommended ranges, correct them before assuming the cyst batch itself is bad.
- If you are hatching dense batches above 2 grams per liter without supplemental oxygen, expect a lower hatch percentage and consider adding an oxygen stone.
Pro Tip: Keep a dedicated conditioner on hand for hatching water only, since even a conditioner meant for display tanks can leave the wrong residue for a cyst batch.
Why farmed, microalgae-fed brine shrimp can be a better option
Hatching your own cysts gives you control, but it also means daily labor, equipment upkeep, and hatch-to-hatch variability in nutrition depending on cyst source and your own technique. A controlled, land-based production system removes most of that variability.
- Shrimp fed exclusively on Dunaliella microalgae under controlled conditions carry a consistent nutritional profile rather than the seasonal swings seen in wild-harvested cysts.
- Demeter Biosciences raises its brine shrimp this way, with a stated target of at least 40% protein content and consistent nutrition claims documented on its own site.
- A controlled production environment also avoids the starvation conditions wild brine shrimp populations face in natural salt ponds, which is one driver of nutritional inconsistency in wild-harvested product.
For hobbyists short on time, or keeping fussy feeders like mandarins that need a steady, enriched live food source, buying live shrimp on a schedule removes the daily hatch cycle from the task list entirely.
What the research actually supports for reef hobbyists
The science here is clear on one point that gets lost in hobbyist forums: timing matters more than most people assume. A 22-hour-old nauplius and a 36-hour-old nauplius are not nutritionally interchangeable, yet plenty of care sheets treat "hatch it and feed it" as a single instruction with no urgency attached.

The bigger gap is between what brine shrimp promise and what they deliver without enrichment. A lot of reef keepers treat a successful hatch as the finish line, when the harder and more valuable step is enriching that batch before it reaches a mandarin or a pipefish fry. Plain nauplii look like a complete food because fish eat them eagerly, but eagerness does not guarantee full nutrition.
If you take one thing from this guide, let it be this: decide first whether your tank's livestock actually needs daily, freshly hatched, enriched nauplii, or whether a consistent, less labor-intensive live food source would serve them just as well. Not every reef tank needs a home hatchery running every day.
— Demeter
How to order Demeter live brine shrimp and subscription options
Running a hatchery every day works for some reef keepers and becomes a chore for others. Demeter Biosciences sells live brine shrimp raised on organic Dunaliella microalgae in a controlled, land-based system, priced at $17 to $35 per order for a single shipment, with no cone, airstone, or shell separator required on your end.
A Demeter Biosciences membership runs $25 per month for recurring shipments, which suits anyone feeding mandarins or pipefish on a steady schedule without wanting to hatch cysts daily. Phytoplankton add-ons and gift cards are offered as additional purchase options. Check handling instructions on arrival before your first feeding.
Sources
- FAO: Aquaculture of brine shrimp (Artemia) — production and use
- Artemia culture and use — Virginia Cooperative Extension (SRAC/TAMU guidance excerpt)
- Peer-reviewed study on optimal harvest time for brine shrimp nauplii (2025)
- DIY brine shrimp hatchery and shell separator — Reef Builders
FAQ
Will brine shrimp survive in a reef tank?
Freshly hatched nauplii generally do not survive long once released into a display tank; most are eaten, filtered out, or settle within a couple of hours. They work best as a fresh, quickly consumed meal rather than a long-term addition to the tank's population.
How many cherry shrimp can I put in a 3-gallon tank?
Cherry shrimp are a freshwater species unrelated to the brine shrimp used as reef tank live food, and their stocking guidance depends on filtration and plant cover rather than the hatching parameters covered here. For a reef tank specifically, brine shrimp nauplii are fed in small, fresh batches rather than kept as a standing population.
Can I feed brine shrimp to clownfish?
Yes, juvenile and adult clownfish readily eat brine shrimp nauplii, and the motion of live shrimp often triggers a strong feeding response. Enriching the nauplii first adds DHA and EPA that plain nauplii lack, which benefits growing juveniles in particular.
How long does it take brine shrimp to reach full size?
Within a hatching cone, cysts hatch into nauplii in 18 to 24 hours under optimal conditions, but reef hobbyists harvest and feed them at that nauplius stage rather than growing them to adulthood. Adult brine shrimp take several weeks to mature, which is well past the point where they offer peak nutritional value as live feed.