
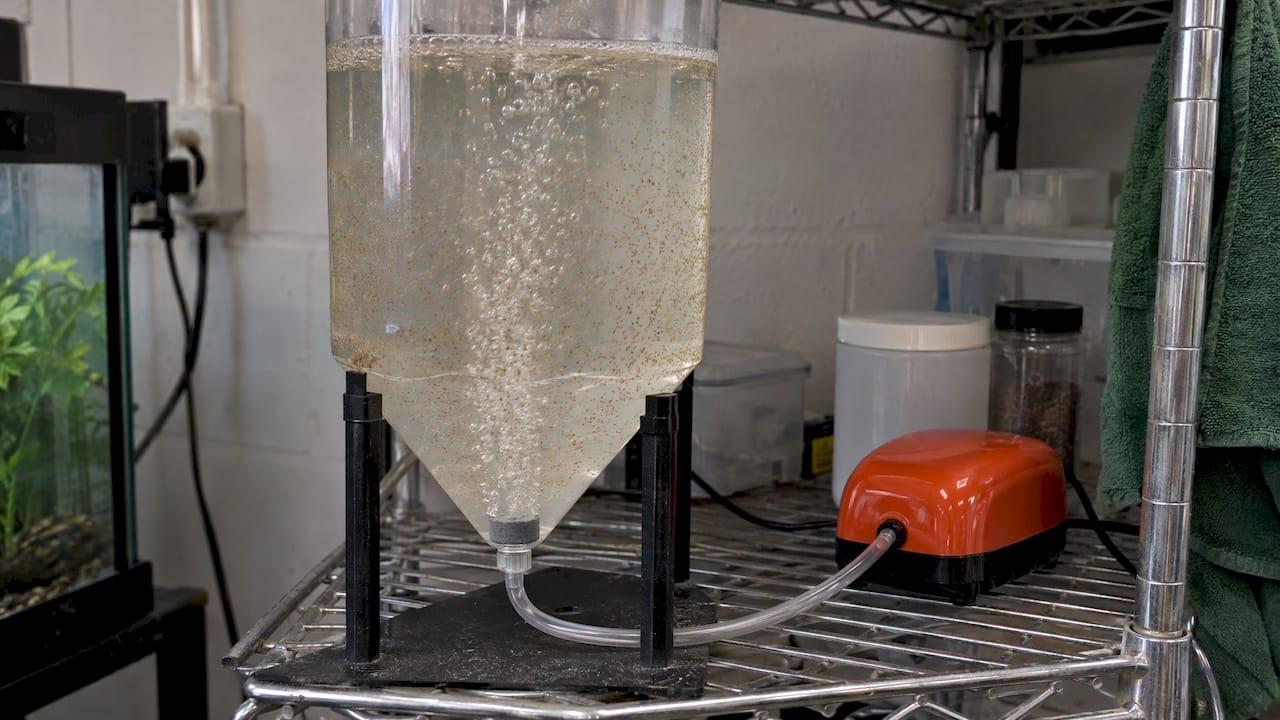
Brine shrimp eggs need steady, moderate aeration for one job: keeping every egg floating in oxygen-rich saltwater until it hatches. Run the airline to the bottom of a cone-shaped container, set a rolling stream of coarse bubbles, and keep the water warm and lit. If you would rather not run a hatchery at all, our live brine shrimp are farmed and fed on the algae Dunaliella, so the feeding step does not depend on your air pump.
Below you will find the numbers, the setup, the signs of too much or too little air, and what changes at hobby, store and farm scale.
TL;DR
- Aeration keeps cysts (the dormant eggs) suspended and supplied with oxygen. Eggs that settle on the bottom can go oxygen-starved and fail to hatch.
- Aim for dissolved oxygen above 2 mg/L, a steady stream of bubbles from the bottom of a conical container, and no foam or eggs thrown up the walls.
- Pair air with the right conditions: roughly 77-86°F, constant light, saltwater and about 1 to 2 grams of cysts per liter.
- Harvest at about 18 to 36 hours by switching the air off and letting the nauplii (newly hatched shrimp) separate from the shells.
- Stores, labs and hobbyists who want consistent live food without managing hatch air can order farmed live shrimp instead.
Table of Contents
- What aeration actually does in a hatch
- The hatch conditions aeration has to work with
- Setting up the airline step by step
- Too much air or too little: reading the hatch
- When you need more than a pump: scaling up
- Why the hatch is only half the nutrition question
- Our perspective
- Order live brine shrimp from Demeter
- FAQ
- Sources
What aeration actually does in a hatch
Most people think of aeration as "adding oxygen." That is half of it. The other half is mixing.
The FAO's 2024 Manual on Artemia production and use reports that hatching rises with oxygen levels in the 0.6 to 2.0 mg/L range, with maximal hatching above that. It also says the cysts must be mixed well so no oxygen gradients form during hatching. Once you are above the threshold, more bubbling does not buy you more hatch. Even suspension does.
A research review on Artemia as live food explains the failure mode: cysts must be kept in suspension in oxygen-saturated seawater, because cysts that pile up on the bottom of the apparatus are often exposed to anaerobic conditions and will not hatch. A university teaching guide makes the same point from the other direction: cysts will not hatch in extremely anoxic conditions.
So the practical goal is simple. Every egg should be moving gently through the water column, and none should be sitting in a dead spot.

The hatch conditions aeration has to work with
Air alone will not rescue a bad setup. These are the ranges published by U.S. university and agency sources.
| Factor | Published range | Source |
|---|---|---|
| Temperature | 77-86°F (25-30°C) | Mississippi State bulletin B1138 |
| Optimum temperature | 82°F (28°C) | Stickleback Stock Center protocol |
| Dissolved oxygen | Above 2 mg/L | UF/IFAS FA176 |
| Light | About 2,000 lux, strong and constant | UF/IFAS FA176 |
| Salinity | 15-35 g/L (UF/IFAS); 25 ppt (Stickleback protocol) | UF/IFAS FA176 |
| Stocking density | 1 to 2 g of cysts per liter | Stickleback, Virginia Tech |
| Time to hatch | About 18-36 hours | Stickleback |
Two details matter for air. First, temperature changes how much oxygen the water holds and how fast the cysts use it, so a warm hatch needs its aeration working properly. Second, density matters: a Gourami production manual from the Center for Tropical and Subtropical Aquaculture notes that hatching above 2 grams per liter can drop the pH and hurt percent hatch. More eggs per liter means more oxygen demand and more pH stress, which is why heavy stocking is the usual reason a hatch fails even with a pump running.
For the full numbers on salinity, pH and temperature, see our guides to brine shrimp water parameters and the brine shrimp temperature range.
Setting up the airline step by step

1. Choose a container that has no dead corners
Flat-bottomed jars let eggs settle into the corners. Conical-bottom containers do not. Mississippi State's bulletin recommends conical-bottom PVC hatching containers fitted with a valve, and the Stickleback protocol uses the same cone shape. At home, an inverted soda bottle or a purpose-made cone does the same job, with the airline at the lowest point.
2. Run a rigid airline to the bottom
The Stickleback protocol specifies adequate aeration through a long rigid airline placed in the drain at the bottom of the cone. Soft tubing floats and drifts, so weight it or use rigid tubing. The bubbles should start at the lowest point and rise through the whole column, pulling settled eggs up with them.
Put the pump above the water level, or add a check valve to the line. Otherwise water can siphon back down the airline into the pump when the power cuts out.
3. Prepare the water
Use saltwater made with dechlorinated water. UF/IFAS notes that tap water is not recommended because chlorine or chloramines affect hatching, and that the optimum salinity is around 15 to 30 ppt (parts per thousand, a measure of salt in water).
4. Add cysts and set the airflow
Stock at roughly 1 to 2 grams of cysts per liter. Switch on the air and open the valve slowly until you see a rolling circulation: the eggs should lift off the bottom and travel up the center, then drift back down the sides. Large, steady bubbles are enough. You are not trying to turn the container into a fountain.
5. Add heat and light
Keep the water in the 77 to 86°F range with a light on constantly. Mississippi State specifies 60-watt fluorescent lights (1,000 lux) 20 cm above the water, while UF/IFAS lists up to 2,000 lux as the optimal range, so more light than a dim room is the goal.
6. Harvest
At about 24 hours, turn off the air and cover the top with a dark lid. Mississippi State describes 15 to 20 minutes of this, so that unhatched cysts and shells float while the orange nauplii concentrate near the bottom. A NOAA gourami manual describes the same method: switch off aeration, leave the container for about 10 minutes, then drain through the bottom valve, with the nauplii drawn toward a light at the bottom.
Do not let the hatch sit once it is done. Virginia Tech warns that nauplii left in the hatching tank too long grow too large and lose nutritional quality. It also advises judging the endpoint of the hatch by microscope counts of hatched, pre-hatched and unhatched cysts, which is how research and commercial operations decide when to harvest.
Too much air or too little: reading the hatch
The FAO explanation gives you the rule. Enough air to hold oxygen above the threshold and mix the water. Anything beyond that is just noise.
Signs of too little air
- A layer of eggs sitting on the bottom or in a corner, not moving.
- A sour smell or cloudy, fouled water partway through the hatch.
- A low hatch percentage even at the right temperature and salinity. Cysts that settle into low-oxygen pockets are the ones that fail, per the VLIZ review.
Signs of too much air
- Eggs thrown up the walls of the container and left above the waterline, where they dry out and stop hatching.
- Heavy foam at the surface and spray around the container.
- Newly hatched shrimp pushed around constantly instead of swimming in the column.
There is no single bubble count that works for every container, because volume, diameter and airline all change the flow. Judge by what the eggs do. If they are all in motion and none are stranded, you have enough. If they are stuck or being flung out, adjust the valve a little at a time and watch for a minute before changing it again.
When you need more than a pump: scaling up
The hobby setup of one bottle and a small pump is a different job from a store or lab hatching daily batches. At larger volumes, oxygen demand climbs with density. Virginia Tech's guidance for intensive culture says non-decapsulated cysts are stocked at about 2 g/L and decapsulated cysts at about 5 g/L, and that pure oxygen can double those densities while keeping dissolved oxygen above 4 mg/L. That is a commercial hatchery system, with metered gas and monitoring.
For a store, museum or research group, the question becomes how much time and equipment you want to spend on hatching versus using the shrimp. If you need steady quantities, our bulk store brine shrimp order is set up for retail and institutional buyers. Labs that care about batch-to-batch consistency can read our notes on research grade brine shrimp and our zebrafish lab hatch protocol.
Why the hatch is only half the nutrition question
Good aeration gets you nauplii. It does not decide what is inside them. Freshly hatched nauplii live off their yolk reserves, and that reserve falls with time. Virginia Tech's point about nauplii growing too large and losing nutritional quality shows how narrow the window is. Many hobbyists and shops therefore end up timing hatches to feedings, which means running several containers on staggered cycles.
Farmed live shrimp shift that work away from your counter. Our shrimp are raised in land-based, organic, sustainable systems and fed only on the algae Dunaliella, with a protein content of at least 40%. If you keep freshwater tanks, see how to hatch at home or source farmed. For reef keepers, we cover the same choice in hatch right or buy for a reef tank, and for refugium setups in brine shrimp in a refugium.
After they arrive, a plain feeding routine is enough. Our brine shrimp feeding schedule checklist and our guide to holding salinity cover it.
Our perspective
We raise brine shrimp for a living, so we think about oxygen in them all the time, but from the other end of the life cycle. A hatchery is a bet that every egg stays suspended and fed with oxygen for a day, and that you harvest at the right hour.
Aeration is the easy part of that bet. Most failed hatches we hear about come down to stocking too many eggs, water that is too cool or the wrong salinity, with an airline that is not at the bottom of the cone.
Our systems are land-based and organic, and the shrimp eat Dunaliella, a microalga, from start to finish. Our aim is at least 40% protein with consistent quality, without the seasonal swings that come with wild harvests. For a fish keeper, store or lab, that means a feeding plan that does not hinge on a pump running perfectly overnight.
Hatch if you enjoy it, and use the numbers above to do it well. When you want dependable live food on a schedule, start with ours.
Demeter
Order live brine shrimp from Demeter
Our live brine shrimp are priced from $17 to $35 for a one-off order. If you want a recurring supply, the Demeter Biosciences membership sends a monthly live shipment for $25 per month. We also sell live phytoplankton at $20 and gift cards from $10 to $50 on our featured products page.
Stores and institutions can order in volume through the bulk store order page. You can start with a single order at our live brine shrimp page.
FAQ
Do brine shrimp eggs need aeration to hatch?
In a standard hatchery, yes. Aeration keeps the cysts suspended and supplied with oxygen, and cysts that settle on the bottom can be starved of oxygen and fail to hatch. A review of Artemia as live food describes that risk directly.
How much oxygen do brine shrimp eggs need?
UF/IFAS lists dissolved oxygen above 2 mg/L as part of optimal hatching conditions. The FAO manual reports that hatching rises with oxygen between 0.6 and 2.0 mg/L, with maximal hatching above it. Past that point, even mixing matters more than extra bubbles.
How long do brine shrimp take to hatch with aeration?
About 18 to 36 hours, depending on temperature, per the Stickleback Stock Center protocol. At the optimum of 82°F you will be at the shorter end. Harvest soon after hatching, because older nauplii lose nutritional value.
Can I use tap water and any salt?
Use dechlorinated water. UF/IFAS says tap water is not recommended because chlorine or chloramines affect hatching. Optimum salinity is around 15 to 30 ppt, and our water parameters guide covers the numbers in more detail.
Sources
- Manual on Artemia production and use (FAO, 2024)
- Artemia salina as live food in aquaculture (VLIZ)
- Teacher Guide, Hatch-A-Cyst (Utah Genetic Science Learning Center)
- Mississippi State MAFES Bulletin B1138
- Artemia Hatching Protocol (Stickleback Stock Center)
- Teach Aquaculture Curriculum: Dancing with Brine Shrimp (UF/IFAS FA176)
- Artemia Culture for Intensive Finfish and Crustacean Larviculture (Virginia Tech)
- A Manual for Commercial Production of the Gourami (CTSA)
- Trichogaster trichopterus production manual (NOAA)