
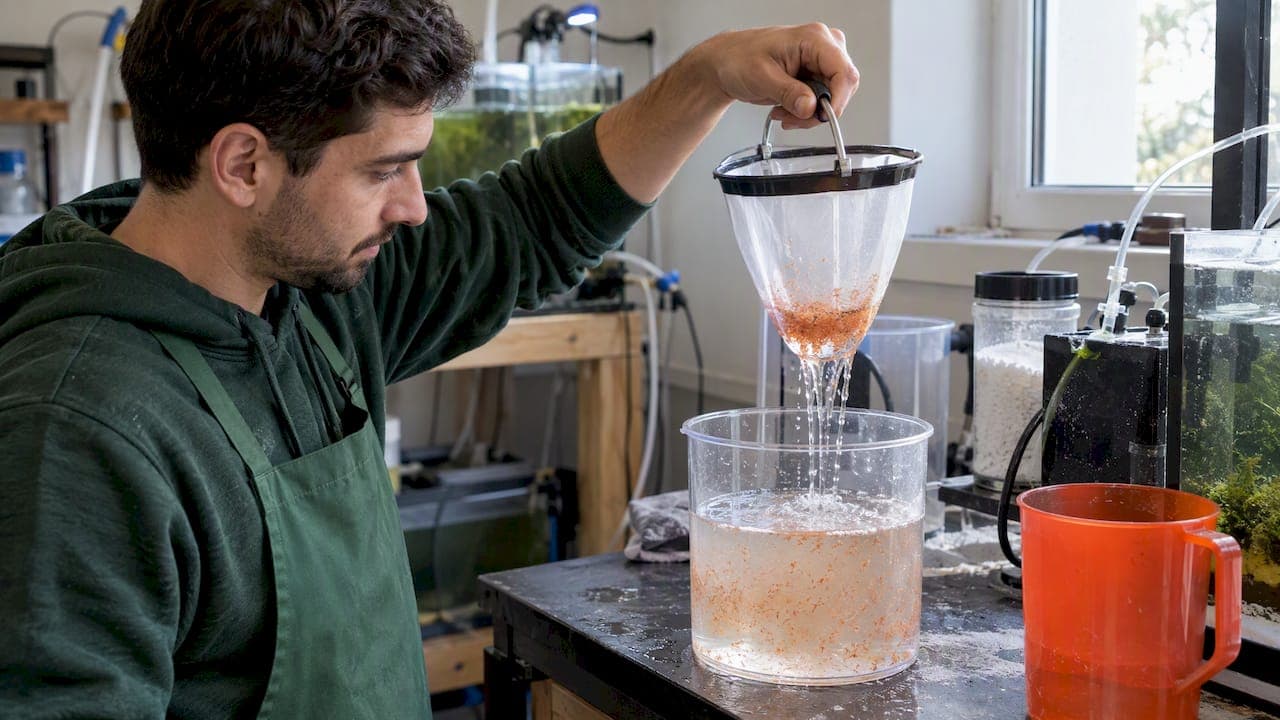
For freshly hatched nauplii, use a fine-mesh sieve around 100 to 130 microns, such as the Ziss EZ Sieve SF-1 or the Large Ziss Brine Shrimp Collector Sieve. Hatch Artemia cysts for 15 to 24 hours, then harvest during the 22 to 36 hour window to catch the most nutritious Instar I and II stage. Rinse thoroughly before feeding, no exceptions.
TL;DR:
- Using a mesh size of around 100 μm best captures newly hatched nauplii, while 120 to 130 μm meshes are suitable for general-purpose harvesting.
- Timely harvesting within 22 to 36 hours after hatching ensures collecting the most nutritious Instar I and II nauplii, before yolk reserves deplete.
- Rinsing nauplii with a steady flow until clear prevents water quality issues in tanks and should be done for at least five minutes.
- A stackable sieve system with multiple mesh sizes improves sorting efficiency by separating different Artemia stages in a single pass.
- Buying farmed, algae-fed live brine shrimp offers consistent protein content and saves the daily hatch-and-harvest effort.
Table of Contents
- The best sieves and nets for sieving brine shrimp
- How to harvest and sieve brine shrimp step by step
- Choosing mesh size and features for your setup
- Rinsing, enrichment, and safe storage after sieving
- Why farmed, microalgae-fed Artemia is worth considering
- What to expect from either approach
- Order ready-to-ship live brine shrimp from Demeter
- Guides and product pages behind this article
- Sources
- FAQ
The best sieves and nets for sieving brine shrimp
Six products cover most of what hobbyists and small hatcheries actually buy for catching Artemia. Some are built for baby nauplii, others for scooping mixed sizes straight into a tank, and a couple are little more than a fine net on a handle.
| Product | Mesh size | Best for | Material | Special features |
|---|---|---|---|---|
| Ziss EZ Sieve SF-1 | 0.10 to 0.13 mm (multiple sizes sold) | Nauplii through general live-food handling | Stainless or nylon mesh | Stackable, suction-mount options |
| Large Ziss Brine Shrimp Collector Sieve | Approximately 130 µm | Scooping and feeding small tanks | Clear plastic body, fine mesh | Clear body for visibility, easy scoop-and-dump |
| JOROBURO Brine Shrimp Net (fine mesh) | Fine hobby-grade mesh | Occasional hatchery users | Handheld net, plastic frame | Low cost, widely available |
| HOBBY Artemia sieve (approximately 120 µm) | Around 120 µm | Catching nauplii in small containers | Nylon mesh | Compact footprint for cup-top use |
| JOROBURO Brine Shrimp Net | Fine hobby-grade mesh | Quick hand-net collection | Handheld net, plastic frame | Budget option |
| Generic 100 to 130 µm hobby sieve | 100 to 130 µm | General-purpose nauplii filtering | Nylon mesh, plastic frame | Widely sold at aquarium retailers |
The Ziss EZ Sieve SF-1 stands out because it comes in a real range of mesh sizes rather than one fixed micron count, so you can stack a 0.10 mm sieve for newly hatched nauplii on top of a coarser one for older Artemia and sort a single batch in one pass. Vendor specs and hobbyist use cases confirm the stainless mesh and suction-cup mount versions hold up better than plain nylon under repeated rinsing.
The Large Ziss Brine Shrimp Collector Sieve takes a different approach: its clear body and roughly 130 µm mesh are built for scoop-and-dump feeding, not precision sorting. Hobbyist testing around this design consistently points to it as a convenient choice for feeding display tanks directly, since you can see exactly how much shrimp you are dumping in and how little salt water comes with it.
The JOROBURO Brine Shrimp Net, in either fine-mesh or standard form, is the cheapest way into sieving. It is a handheld net rather than a cup-fitted sieve, so it suits someone who hatches a batch occasionally and wants something that works without extra hardware, not someone running a daily hatch-and-feed routine.

The HOBBY Artemia sieve, along with the many generic 100 to 130 µm hobby sieves sold under similar names, fills the cup-top niche: small, cheap, and just fine enough to hold back nauplii while letting rinse water through fast.
A few buying notes worth keeping in mind:
- Cup-top collection favors compact sieves like the HOBBY Artemia sieve or a generic 100 to 130 µm model.
- In-tank feeding favors a clear-body design like the Large Ziss collector sieve.
- Bulk harvest across multiple hatch cones favors a stackable, multi-mesh system like the Ziss EZ Sieve SF-1.
- Occasional or single-batch users can get by with a basic net such as the JOROBURO.
How to harvest and sieve brine shrimp step by step
Getting clean, high-density nauplii out of a hatch cone comes down to timing, light, and a gentle hand. The SRAC fact sheet from Mississippi State puts the ideal hatch environment at around 28°C (82°F) with salinity of 30 to 35 ppt, continuous aeration, and light. Nauplii typically emerge between 15 and 24 hours, and the best harvest window runs from 22 to 36 hours, which is when Instar I and II nauplii carry the most nutritional value before their internal yolk reserves run out.
- Confirm your hatch is inside the 22 to 36 hour window before you touch the cone.
- Turn off aeration and let the culture sit undisturbed for several minutes so shells float and unhatched cysts sink.
- Shine a light against the side of the container near the bottom. Nauplii are positively phototactic and will swim toward it, concentrating away from shells and debris, a technique the FAO's Artemia guidance treats as standard practice.
- Siphon or gently pour the illuminated, nauplii-dense zone onto your sieve, leaving shells and cysts behind in the cone.
- Rinse the catch under a light, steady flow until the runoff looks clear.
- Transfer the rinsed nauplii to a holding or enrichment container at a reasonable density rather than dumping the whole batch into one crowded jar.
This two-step method, concentrating with light before siphoning onto the sieve, pulls far fewer shells and unhatched cysts through than simply pouring the whole culture straight over mesh. For temperature control during this process, see our guide on hatching and holding temperatures for brine shrimp.
Pro Tip: Check a small sample under a magnifier or loupe after rinsing. If you still see broken shells or cyst casings, run the batch through a second light-concentration pass before feeding.

Choosing mesh size and features for your setup
Mesh size is the single biggest decision in sieving brine shrimp, and it depends entirely on what stage of Artemia you are catching and what your fish need to eat.
- Use very fine mesh, around 100 µm, when your goal is to retain the smallest newly hatched Instar I nauplii without losing them during rinsing.
- Use 120 to 130 µm mesh as a general-purpose choice that balances nauplii retention with faster rinsing and less clogging.
- Use 180 to 220 µm mesh for older, larger Artemia or adult brine shrimp headed to bigger fish or fry that have outgrown nauplii.
The tradeoff runs in both directions. A very fine mesh catches more of the smallest nauplii but clogs faster, drains slower, and can crush delicate Instar I stages if you rinse too aggressively. A coarser mesh rinses quickly and resists clogging but will let some of your smallest nauplii slip straight through, according to product specs and hobbyist guidance on sieve selection.
Beyond mesh size, a few physical features matter for day-to-day use:
- Stackable sieves let you sort one batch across multiple mesh sizes in a single pass.
- A clear body makes it easy to judge density and catch quality before you feed.
- A suction-cup mount turns a sieve into a semi-permanent in-tank feeding station.
- Stainless mesh resists deformation and lasts longer than nylon under frequent cleaning, though nylon is cheaper to replace.
Most of these sieves fit standard hatch cones, cups, and 1 to 5 liter incubators without modification, so compatibility is rarely the limiting factor. Our guide to setting up a brine shrimp feeding station covers how to mount a collector sieve directly on tank glass for repeat use.
Rinsing, enrichment, and safe storage after sieving
Rinsing is not optional. The hatching medium carries dissolved salt, ammonia and other metabolites, and potential bacterial loads, and pouring it straight into a display tank or fry rearing container can foul water quality fast, a point the FAO's Artemia culture guidance makes directly.
- Rinse under gentle, steady flow for at least five minutes, until the runoff runs visibly clear, a benchmark drawn from hatchery harvest protocols.
- Use a matched-salinity rinse when nauplii will sit in an enrichment tank afterward, and a brief freshwater rinse when they are going straight into a freshwater tank.
- Hold enriched or rinsed nauplii at a reasonable density with active oxygenation and stable temperature rather than crowding them into a small jar.
- Feed within 24 hours when possible, and keep any short-term hold cold to slow metabolic activity without harming the nauplii.
Enrichment and harvest for production use call for dissolved oxygen above 4 mg/L during holding, a threshold that matters just as much in a small home setup as in a commercial hatchery. Our step-by-step rinse protocol walks through the exact process for a home tank.
Why farmed, microalgae-fed Artemia is worth considering
Sieving your own hatch works, but it takes daily attention to timing, mesh, and rinsing. Demeter Biosciences raises live brine shrimp in land-based systems fed exclusively on Dunaliella algae, which the company states keeps protein content consistently around 40%, avoiding the seasonal starvation swings common in wild-harvested Artemia.
- Buying instead of hatching saves the daily hatch-and-harvest cycle entirely.
- A land-based, algae-fed system removes the guesswork of wild supply variability.
- Subscription shipments suit anyone who wants steady feed without managing mesh sizes or rinse timing.
Readers who decide DIY sieving is not worth the daily effort can review live brine shrimp options directly.
What to expect from either approach
A fine sieve rewards daily attention with fresher, cheaper nauplii. A two-tool setup, a 100 µm sieve for catching and a clear collector sieve for feeding, covers most home needs without much fuss. Ordering live shrimp trades that routine for convenience.
— Demeter
Order ready-to-ship live brine shrimp from Demeter
If sieving on a schedule is not something you want to manage, Demeter Biosciences ships farmed, algae-fed live brine shrimp directly, with live brine shrimp priced from $17 to $35 per order and a monthly membership at $25 for recurring shipments. Buying removes the hatch cone, the mesh, and the rinse entirely.
Check current live brine shrimp availability or look into bulk ordering for stores and institutions.
Guides and product pages behind this article
- SRAC Artemia production fact sheet
- FAO Artemia culture and harvesting guidance
- Virginia Tech Artemia hatchery protocols
- Ziss EZ Sieve SF-1 product specs
- Large Ziss collector sieve product page
Sources
- Artemia Production for Marine Larval Fish Culture (SRAC / MS State)
- The Culture, Use and Feeding of Brine Shrimp Artemia in Aquaculture (FAO)
- Artemia culture and hatchery protocols (Virginia Tech / extension publication)
- EZ Sieve SF-1 Brine Shrimp Sieve - Ziss Aqua
- Large Ziss Brine Shrimp Collector Sieve – Aquarium Co-Op
FAQ
What size sieve for brine shrimp?
Use a sieve around 100 µm for freshly hatched nauplii and 120 to 130 µm for general hatch-to-feed use. Larger Artemia or adults call for a coarser 180 to 220 µm mesh.
What is the best brine solution for brine shrimp?
Most hatchery guidance recommends a salinity of 30 to 35 ppt with steady aeration and light exposure. This range supports reliable hatch rates without stressing the cysts.
What is the fastest way to hatch brine shrimp?
Keeping the culture at roughly 28°C (82°F) with continuous aeration and light produces hatching within 15 to 24 hours. Lower temperatures slow the process and delay your harvest window.
How long does it take brine shrimp to reach full size?
Definitions vary by rearing conditions, but most hobbyist and hatchery sources treat the 22 to 36 hour window after hatching as the peak nutritional stage rather than full adult growth, which takes considerably longer and is rarely tracked by home hatchers. Growth to adult size depends heavily on feed, density, and temperature.