
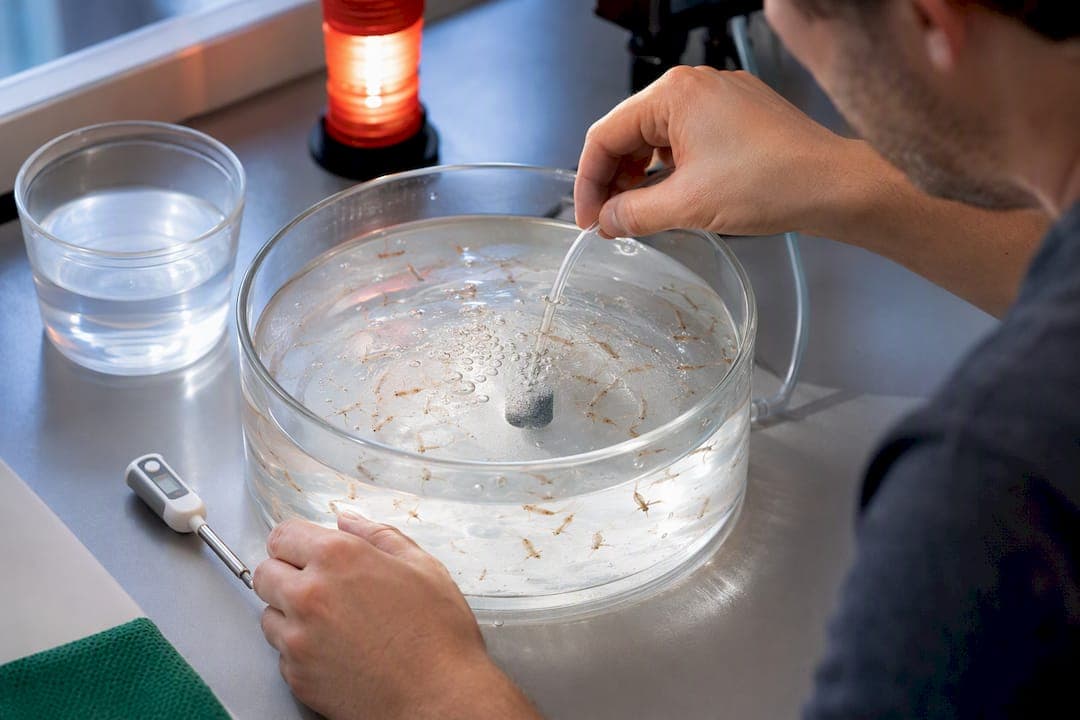
Yes, you can often revive stressed live brine shrimp, as long as they haven't decomposed. Move them immediately into clean, oxygenated water at 25 to 30 ppt salinity and hold the temperature steady near 75 to 80°F. Dormant cysts have a much better shot at coming back than shrimp already showing tissue breakdown. Expect partial recovery in minutes, full hatching cycles in 18 to 36 hours.
TL;DR:
- Using non-iodized salt and maintaining salinity between 25 and 30 ppt is crucial for successful revival and hatching of brine shrimp.
- Rapid response within the first 30 minutes, including gentle transfer and proper water conditions, significantly improves survival chances.
- Dead or deteriorating cysts beyond 40 hours of incubation are unlikely to hatch, emphasizing the importance of fresh, viable stock.
- Frozen cysts should thaw slowly in the refrigerator and be rinsed before transfer to warm, aerated brine to ensure hatchability.
- Regularly supplying pre-mixed, correctly stored live shrimp from a reliable supplier can eliminate most troubleshooting and improve consistency.
Table of Contents
- How Do You Revive Live Brine Shrimp in the First 30 Minutes?
- Step-by-Step Revival Methods for Cysts and Chilled Shrimp
- Why Do Brine Shrimp Fail to Revive? Common Causes
- How to Store and Hold Brine Shrimp So They Stay Viable
- Why Farmed, Microalgae-Fed Shrimp Fail Less Often
- Our Take: Stop Treating Every Batch Like an Emergency
- When It's Time to Switch to a Reliable Live Shrimp Supplier
- Sources
- FAQ
How Do You Revive Live Brine Shrimp in the First 30 Minutes?
Speed matters more than technique here. A brine shrimp culture crashing from cold shock or low oxygen has a narrow window, usually under an hour, before damage becomes permanent. Work through this checklist in order.
- Check the water first. Test salinity with a hydrometer or refractometer. Brine shrimp need 25 to 30 ppt, roughly the salinity of ocean water diluted slightly. Tap water alone will kill them within minutes.
- Mix fresh brine using non-iodized aquarium salt or solar salt. Never use table salt. Iodine and anti-clumping additives in table salt are toxic to brine shrimp and a documented cause of hatch failure.
- Warm the new water to 75 to 80°F (24 to 27°C) before transferring shrimp into it. A sudden temperature swing in either direction stresses them further.
- Add gentle aeration with a small air stone, not a powerful pump. Brine shrimp are weak swimmers, and a strong current will tumble and exhaust them.
- Transfer shrimp carefully using a pipette or a turkey baster instead of pouring or netting them, which tears their delicate exoskeletons.
- Separate live shrimp from empty shells and debris. Turn off aeration for about 10 minutes and shine a light on one side of the container. Live nauplii swim toward the light and cluster near the surface, where you can siphon them off cleanly.
- Check for signs of life. Healthy shrimp swim in short jerky bursts. Sluggish, sinking, or motionless shrimp still have a chance if the body is intact.
- Stop immediately if you smell anything foul or see disintegrating tissue. That is not stress, that is death. Do not feed decomposed shrimp to fish; the ammonia spike alone can harm a tank.
Pro Tip: Keep a spare container of pre-mixed brine at the correct salinity and temperature on standby if you feed live shrimp daily. Having rescue water ready cuts your reaction time from ten minutes to ten seconds.
Most successful rescues happen because someone acted within that first half hour rather than researching the problem first. If shrimp are still moving, even weakly, the odds favor recovery once water conditions are corrected.

Step-by-Step Revival Methods for Cysts and Chilled Shrimp
Different failure scenarios need different fixes. A bag of dry cysts that never hatched is not the same problem as live nauplii gasping in a stagnant cup. Here's how to handle each.
Reviving Dry Cysts That Won't Hatch
- Mix brine at 25 to 35 ppt using non-iodized salt and warm it to 77 to 82°F.
- Add one to two teaspoons of cysts per liter of water.
- Run continuous aeration with an air stone strong enough to keep cysts suspended, not sitting on the bottom.
- Keep the container under light for the first 24 hours. Light exposure speeds hatching.
- Watch for orange, free-swimming nauplii. Under these conditions, hatching typically completes in 18 to 36 hours, with warmer water on the shorter end of that range.
- If nothing hatches by hour 40, the cysts were likely already dead or damaged by poor storage.
Thawing Frozen Brine Shrimp Cysts Safely
Frozen cysts can remain viable for a long time when frozen correctly, but thawing them wrong undoes that work fast.
- Move the container from the freezer to the refrigerator and let it thaw slowly overnight, rather than thawing at room temperature or under warm water.
- Once fully thawed, rinse the cysts briefly in cool, dechlorinated water to remove any freezer residue.
- Transfer rinsed cysts into warm, aerated brine at the same 25 to 35 ppt range used for fresh cysts.
- Expect hatching to follow the same 18 to 36 hour window, since thermal shock during thawing, not the freezing itself, is the usual reason frozen cysts fail to hatch.
Rescuing Chilled or Oxygen-Starved Live Nauplii
Live shrimp that got too cold in shipping or ran out of oxygen in a crowded jar need a gentler touch than dry cysts.
- Raise the temperature gradually, about 2 to 3 degrees every 15 minutes, rather than dropping them straight into warm water.
- Do several small partial water changes instead of one large dump, which prevents osmotic shock from a sudden salinity shift.
- Add aeration immediately if the water smells stagnant or shrimp are clustered at the surface gasping.
- Avoid changing salinity and temperature at the same time. Fix one variable, wait ten minutes, then adjust the other.
Basic equipment worth keeping on hand:
- A hydrometer or, better, a refractometer for accurate salinity readings
- A small air pump with a single air stone
- A pipette or turkey baster for gentle transfers
- A dedicated hatching container separate from your main aquarium equipment
A simple shallow dish without aeration can hatch a small batch of cysts in a pinch, which is why many beginners succeed with almost no equipment before scaling up to daily culturing. Once you're feeding a tank on a regular schedule, though, aeration stops being optional. Reliable batches at scale need it, and metal toxicity from tap water becomes a real risk if you're refilling constantly from the faucet.
Why Do Brine Shrimp Fail to Revive? Common Causes
When revival attempts fail repeatedly, the problem is almost always one of four things: bad cysts, wrong salt, contaminated water, or a crashed culture. Isolating which one is happening saves you from repeating the same mistake next week.
Run a small-test hatch to check cyst viability. Hydrate a teaspoon of cysts in warm, aerated brine and watch closely. If free-swimming orange nauplii don't appear within 24 to 36 hours, that batch is likely dead, and no amount of fiddling with temperature will fix it.

Salt type trips up more hobbyists than anything else. Iodized table salt and salt with anti-clumping agents interfere with hatching and can be outright toxic to embryos. Stick to non-iodized aquarium salt or solar salt made for marine tanks.
Tap water is the other quiet killer. Heavy metals and chlorine compounds in municipal water can kill embryos on emergence, even when salinity and temperature look perfect on paper. Using a water conditioner, or better yet, aged water from an established tank, helps neutralize this risk, since dissolved organic matter in older tank water tends to bind free metal ions before they reach the embryos.
Bacterial blooms and ammonia buildup show up as cloudy water, a sour smell, or a sudden die-off after 24 to 48 hours of otherwise normal hatching. Once ammonia spikes in a small container, the culture usually can't be saved. It's faster and cleaner to discard it and start a fresh batch than to try recycling contaminated brine.
Fast diagnostic checklist:
- No hatch at all → suspect dead cysts or iodized salt
- Nauplii hatch but die within hours → suspect tap water contaminants or wrong salinity
- Cloudy water with a sour smell → suspect bacterial crash, discard and restart
How to Store and Hold Brine Shrimp So They Stay Viable
Prevention beats revival every time, and most of it comes down to storage discipline.
- Store dry cysts cold, dry, and sealed. A refrigerator or freezer extends shelf life significantly compared to leaving cysts at room temperature in a humid environment.
- Hold live adult shrimp cold and aerated for short-term use. Refrigerated, aerated brine keeps adults usable for roughly 48 to 72 hours, though nutritional value drops the longer they sit.
- Harvest and feed nauplii promptly. Freshly hatched shrimp still carry their yolk sac, which is their most nutrient-dense stage. Waiting too long means feeding your fish shrimp that have already burned through those reserves.
- Rinse shrimp before feeding to remove excess brine, especially for freshwater tanks where salt buildup causes problems over time.
- Culture out for a few extra days if you want larger shrimp for bigger fish, rather than harvesting at the nauplii stage for smaller fry.
- Check packaging when buying live shrimp. Sealed containers with visible water clarity and active movement are good signs; cloudy or foul-smelling water in the bag is not.
Pro Tip: If you feed daily, holding shrimp cold for 48 to 72 hours with light aeration beats trying to hatch a fresh batch every single day. It's less equipment, less mess, and far more consistent.
Why Farmed, Microalgae-Fed Shrimp Fail Less Often
Most revival headaches trace back to inconsistency, wild-harvested cysts sitting in warehouses through unpredictable seasonal cycles, or shrimp that were already nutritionally depleted before they reached the bag. Some producers raise brine shrimp in controlled, land-based systems and feed them exclusively on Dunaliella microalgae, which may avoid the starvation conditions common in wild salt-lake harvests.
A shrimp that's been well fed and shipped fresh doesn't need a rescue protocol. It needs a clean tank and a pipette. The whole point of controlled cultivation is to make the ten-step triage checklist unnecessary in the first place.
Packaging matters just as much as feed quality. Shipments arriving in sealed, oxygenated containers with clear water and visible movement give you a much better starting point than cysts that spent weeks on a warehouse shelf. When the shrimp arrive healthy, revival stops being the daily chore it is for hobbyists relying on inconsistent wild stock.
Our Take: Stop Treating Every Batch Like an Emergency
The conventional advice online treats every sluggish shrimp like a crisis requiring a ten-step rescue mission. That's backwards. The real lesson from hatch-rate data and hobbyist troubleshooting guides is that most "revival" problems are actually prevention failures that happened days earlier: bad salt, contaminated tap water, or cysts that sat too long in a hot garage.
We'd argue the checklist matters less than the habit behind it. Test your salinity before you panic about temperature. Rule out iodized salt before you blame your air pump. And if you're feeding fish daily, stop treating hatching as a daily gamble. A short-term cold-holding routine solves more problems than any last-minute rescue ever will.
The biggest thing hobbyists underestimate is how much of this is about the shrimp's condition before you ever touch the water. Cysts fed on inconsistent wild diets and stored inconsistently start every batch at a disadvantage. Fix your inputs first. The triage skills matter, but they matter less when you rarely need them.
— Demeter
When It's Time to Switch to a Reliable Live Shrimp Supplier
If you're troubleshooting hatch failures every week, or feeding fry on a schedule too tight for a 36-hour hatch window, the math stops favoring do-it-yourself batches. Demeterbioscience raises brine shrimp on a controlled, land-based system fed exclusively on Dunaliella microalgae, targeting at least 40% protein content with none of the seasonal starvation swings that plague wild-harvested cysts.
For hobbyists feeding one or two tanks, a single live brine shrimp shipment priced between $17 and $35 covers a feeding cycle without a single hatching attempt. If you feed daily or run multiple tanks, the monthly membership plan at $25 a month keeps fresh shipments arriving on a schedule instead of leaving you to guess at cyst viability. Fish stores, museums, and research operations feeding in volume can look at bulk ordering instead of managing multiple hatch batches in parallel.
Whatever path fits your setup, check the shipment for sealed packaging, clear water, and active movement on arrival, the same signs covered earlier in this guide. Place an order through the live brine shrimp product page and skip the next round of hatch troubleshooting entirely.
Sources
- HATCHING and GROWING BRINE SHRIMP (Artemia)
- Care Guide: Brine Shrimp | Carolina Biological Supply
- Freezing Brine Shrimp Eggs: A Complete Guide For Aquarium Enthusiasts | CyFreeze
FAQ
How Do You Keep Live Brine Shrimp Alive Longer?
Keep them cold (refrigerator temperature) with gentle aeration rather than at room temperature. This slows their metabolism and extends usability to roughly 48 to 72 hours without a major nutritional drop.
How Long Do Live Brine Shrimp Actually Live?
Adult brine shrimp can survive for several weeks in ideal conditions, but for feeding purposes, most hobbyists use them within 48 to 72 hours of hatching or arrival, since nutritional value drops as they age. Freshly hatched nauplii are the most nutrient dense and should be fed promptly.
Can Baby Brine Shrimp Survive in Freshwater?
No. Brine shrimp are saltwater organisms and will die quickly in freshwater due to osmotic shock. Always rinse them briefly before feeding freshwater fish rather than transferring them directly from brine into a freshwater tank.
How Do You Raise Brine Shrimp to Adulthood Instead of Feeding Nauplii?
Culture hatched nauplii for several extra days in aerated brine with a small amount of algae or yeast for food, rather than harvesting immediately. This produces larger shrimp suited to bigger fish that need more substantial prey.
How Much Does Demeterbioscience's Live Brine Shrimp Cost?
A single live brine shrimp shipment runs $17 to $35 depending on order size, while the monthly membership for recurring shipments is $25 per month. Bulk pricing for stores or institutions is available through the bulk order page.